Windows 10 Woes...Part 1
Recently, I have been experiencing a lot of issues with Microsoft’s Windows 10 operating system. Well, that’s not true; I have been continuously experiencing issues with Windows 10 since it was first released. Next to the failed, Windows Me version, Windows 10 is probably the most troublesome Microsoft operating system to work with to date. It is so bad; I recently decided to switch to Mac for my personal use. That decision solved my home life compute issues. But, it did not address computer issues the businesses I work with decide to invest. Unfortunately, Microsft is still the hundred-pound gorilla in that space. So for all you techies and home users out there beating your heads against the wall with Windows issues, this series is for you (us).
First, let me start by saying that I am a big proponent of learning and adopting quick and permanent solutions to computer issues. There is nothing worse than to go to your corporate I.T. department and have them tell you, “Leave you P.C. here, we will need to restage it for you.” While some valid cases require a restage, MOST DON’T. At least, that has been my experience. When someone tells you that they need to restage your computer or that the operating system reinstalled, Red Flags should go up. For this series, I am focusing on these types of cases, where Microsoft Professionals have suggested flushing a system as their solution. Some of these cases could have taken 10 minutes or less to fix, some a bit longer. But the time saved pales in comparison to the hours or days it could take to reimage and reload a machine.
So, let’s get started with a rather pesky issue.
Start Menu Critical Error
Symptom: When clicking on the Windows 10 Start Menu, a blue banner error pops ups stating “Critical Error: Your Start menu isn’t working. We will try to fix it the next time you sign in.” then there is an action button that states, “Sign Out Now.” Of course, this error will stay up until you click on the “Sign Out Now” button. But when you log back in, Windows DOES NOT fix your problem, it still the Critical Error occurs.
In addition to this key indicator, there are some other subtle errors. The volume control in the system tray is not responsive, or you see a small processing circle for a short time and is gone. Same for network settings in the system tray area. Oh, and let’s not forget Cortana, that system hog will also not work and you won’t be able to search anything on your system.
Possible Issues:
1) Its Windows 10, anything can go wrong (Just Kidding!!! Well, maybe not..;-)
2) A corrupted or failed Windows Update occurred.
3) Missing or corrupt registry entry.
4) Windows Image Corruption
5) Corrupted User Profile
Possible Solutions:
I am going to preface this section by saying that I have tried each of these solutions with the final one being the ONLY one that resolves this problem 100% of the time. However, I will present each one in the order from least to most evasive with the most impactful still not requiring a full reinstall of the P.C.
Pre-Work Before ANY Solution:
If possible, create a System Restore Point before starting any of the solutions identified below. His backup is just in case the results don’t come out as you expect, you can at least return to your issue starting point.
Solution #1 – Shutdown and Restart the Computer:
The always tried and true method of Windows, shut it down or restart it and see if the problem magically goes away. The truth is, before you start any in-depth troubleshooting, it is always best to start with the basics. Completely Shutting Down and Restarting the computer is by far, ALWAYS step one!
To start, open a command prompt (CMD) with Administrator permissions and then run the following command:
shutdown /s
This command can take 30 seconds to before the shutdown starts, but let it take the computer down COMPLETELY! This process will eliminate ALL issues that are possible when you start the system back up. A restart may leave certain conditions active that could be contributing to your problem, so, again, always start with a completely, shutdown computer. Once it has completely shut down, go ahead and power it back up and see if the problem remains. If so, shut down again and then go to Solution #2.
As a point of reference, here are a few other commands you may find handy as you work through this solution regarding shutting down and restarting your P.C.
To restart your computer, type in the following command at the command prompt:
shutdown /r
This command will restart the computer in 30 seconds. If you want to set the timer shorter, you can use:
shutdown /r /t 5
This command will restart the computer in 5 seconds. You can also change the number (5) in the sample to any number of seconds you want. If you need to abort the restart for some reason, use the following before the timer runs out:
shutdown /a
After the restart, see if the problem still exists. I strongly suggest trying to access the volume control or wireless listing in the System Tray. If they still don’t work, most-likely your Start menu problem will be there.
Solution #2 – Run System File Checker:
Open a command prompt (CMD) with Administrator permissions and then run the following command:
sfc /scannow
Press enter and let the process run. After it runs, reboot your computer and see if it fixed the problem. Given that your Start menu may still be acting up before you reboot, you can restart the computer via the command line options in Solution #1. If the problem still exists, try Solution #3.
Solution #3 – Repair the System Image:
Open a command prompt (CMD) with Administrator permissions and then run the following command:
Dism /Online /Cleanup-Image /RestoreHealth
Let the process run. It may take a while, and you may see some red warnings as it runs. This part of the process is normal, and you can ignore them. Once it finishes, restart the computer (again recommend via the command line). Once it comes up, log back in and see if the problem still exists, if so, go to Solution #4.
Solution #4 – Replace Your User Profile:
Chances are, at this stage, your computer profile is hosed, and you will need to replace it. Some similar solutions suggest just creating a new profile all-together, but the following solution allows you to keep your existing profile name when the process is complete. This procedure is a little involved, but the overall time it takes is far less than a reimage of your P.C., so it is well worth the time.
Test the Problem:
Before you spend a lot of time on this part of the problem, it is essential that you first verify that the problem is with the profile and not something much more complicated. To do this, you will want to create a new user on your machine, login in as them, and see if the problem occurs.
Open up a Command Prompt (CMD) with Administrative permissions. Then, type in the following command:
net user username /add
Press enter and execute the command, once it has finished, log off and log in as the new user. Once you have logged in as the new user, try the Start menu. If it is working, you have verified that the problem is with your profile and not more rooted in the system.
Fix Your Profile:
Now that you have verified the problem is with your profile, you need to do the following to fix your current profile:
1) Log in as an Administrator for the computer. You need to have local Administration Rights to the P.C. If this is your personal P.C., it may be your defunct user account. At this point, you will want to create a separate administrator account that you only use for system issues like this. It is a good idea to have at least one other user account to apply for Administration functions. Just don’t forget the password as it going to be an account you should rarely use and not use it for everyday use. Create A Local Administration User Account.
2) Once you have created the new Administrator account, log in to that new account.
3) Bring up a File Explorer window and from the main drive go to the user profile directory.
C:\Users\
4) Locate the bad user profile (i.e., it should be the user name you log in as, typically. Rename the directory by putting a “_Bad” at the end of it:
<Defunct_Directory>_Bad
For example, if the name of the directory is JoecoolUser, then rename it JoecoolUser_Bad, then press ENTER to lock it in.
5) Next, while still logged in to the administrative account, open the Windows Registry by click on the Start Menu and then typing:
regedit.exe
Then in the menu listing of application, find the Regedit option and right-click on it and select, “As Administrator.” A security prompt will appear to state if it is YES to execute the file, click “YES” and let the Registry Editor come up.
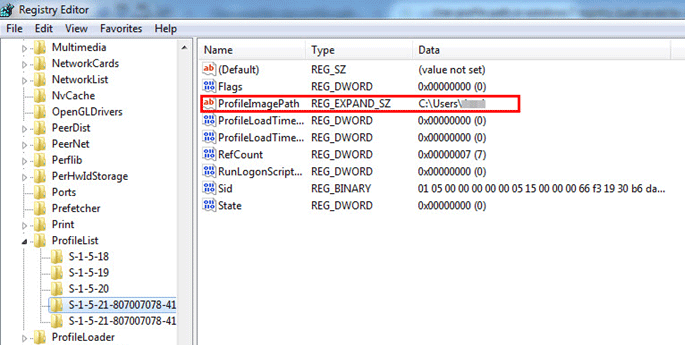
6) Within the Registry Editor, expand
HKLM>SOFTWARE>MICROSOFT>WINDOWS NT>CURRENT VERSION>PROFILELIST
By the way, for those novices out there, HKLM means HKEY_LOCAL_MACHINE.
The profile list will contain a few directories that look something like this:
7) At this point, you have backed up your existing profile directory, and you have told Windows 10 that the “bad” profile no longer exists. Now, log off as Administrator and log back with the same username you just removed.
Windows will now create a new profile with the same username as you once had.
8) Once you get into your newly created account, test the Start menu, Volume Control, Cortana and the network and notification options in the system tray area. If all this work, your core problem fixed.
You may also want to bring up Windows Calculator and Alarm Clock to make sure there is not something deeper at play with Windows. Again, if these all work, you are ready for the final step.
9) Now that you have your new profile log off and log back into the Administrator account.
10) Open File Explorer and navigate to the C:\User Profile Directory. You should see the newly created profile directory and the “Bad” profile.
11) From the top menu of File Explorer, click on VIEW. Make sure Hidden Items and File Name Extensions options are checked.
12) You will want to copy the contents of your Documents, Downloads directories from the “bad” profile to the newly created one. You may have a few other application directories you might want to copy over.
NOTE: If the directories are for cloud-based apps like Evernote, or a cloud drive like Dropbox or Google Drive, you can leave those alone. Just configure those in your new profile, and they will sync. Same goes for browser favorites, and bookmarks of you have been logging in to your browsers and have them set to SYNC. Otherwise, you might want to copy those over.
WARNING: I highly advise NOT to copy everything over from the old profile to the new profile, you will end right back where you started. Also, DO NOT copy over your APPLICATION DATA FOLDER. While there may be some settings you want, it is much better to just reset those in the new profile than try to pull them from this folder. Doing so can create some unpredictable issues for your computer.
If you have installed programs like Microsoft Office, Adobe Acrobat, those applications will still be available. It is programs that are set only to be used by installing user that you might need to reinstall.
That is it. Your done and back on the road to effective computing…for now.